A seamless transitioning detail between walls and ceilings is a design aspect that should never be overlooked in a space. With our Click-on products, we’ve made it easy to achieve clean-looking details within your walls and ceiling transitions.
In this blog post, we will demonstrate how to achieve correct transitions with our timber and aluminium products, so the finished results are flawless.

Our Click-on range of products covers our Click-on Battens, Click-on Screens and Click-on Cladding, all fantastic at creating textural features within design. A lot of interiors and exteriors use Click-on Battens as a feature lining to provide clean lines with minimal spacing as they offer a simple install and look stunning.
Long straight lines of timber or aluminium need to be installed with pin-point accuracy to ensure alignment and the best finish possible. We’ve factored this into our product and have a variety of accessories for use during installation to ensure a clean finish and exceptional accuracy. We have a range of end junction options which are elaborated on further down in this blog.

However, before we get to them, one of the most recommended ways to connect battens on a wall to a ceiling is with miter joins.
Miter joins are made by cutting two connecting batten ends at a 45° angle, to form a corner join at a 90° angle. These simply click-on to the mounting tracks and connect securely in alignment.
The ceiling and balustrade transition seen within Creek Street Christian College is a prime example of using miter joins (right pictured). Spotted Gum Click-on Battens feature on walls and ceilings with perfectly executed miter joins connecting them together.


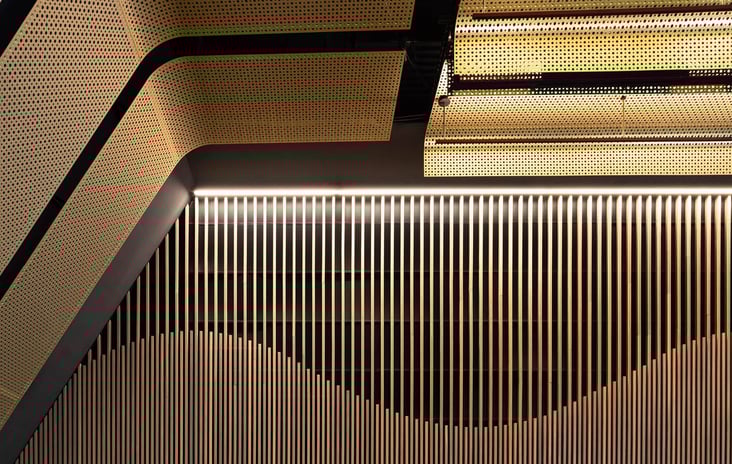
A really striking design inclusion is blending Click-on Battens with Click-on Screens by lining up the battens on each area to create continuation.
An office fit-out demonstrates this perfectly (left pictured), with a screen perched behind a reception desk which connects with Click-on Battens stretching to the first floor which then connect with the batten ceiling.

For curved timber, we’ve made it easy to connect the wall with a ceiling.
We ensure that the piece of timber from the ceiling (or wall) is steam bent at precisely the right angle to meet up with the corresponding battens. Creating clean linear lines which stay in place.
Throughout the foyer of EastCo (pictured), our curved Click-on Battens feature as a transition from the ceiling of the floor below. Crafted from White Oak, the timber is permeable and able to be curved to hug the interior.

In most applications using Click-on Battens, installers are faced with a junction; usually a corner, or coming up to a window or door. Below is a list of end junctions that we provide and the best method for detailing end junctions with aluminium and timber battens.
When timber battens are supplied in random lengths and need to be joined together, we have end matching. A small tongue and groove profile is created on the ends of the battens so they can interconnect. A batten joiner is also used to reinforce the strong joins between battens. Where the battens butt into a wall or are visible, we recommend cutting off the tongue at the edge for a clean finish.
For aluminium battens, no end-matching is used but a different type of batten joiner is used to add rigidity across battens.
Where Click-on Battens are installed along a wall and then stop at a corner on an angle, an angle bracket is recommended to provide a clean finish by covering the mounting track and acoustic backing (if any).
The angle bracket is installed flush with the end of the mounting track so one side comes up to cover a small part of the batten and the other half wraps underneath the mounting track, staying securely in place.
In vertical batten applications, to prevent any slippage from occuring we have designed a base detail plate. This ‘l’ shaped metal plate is installed at the end of the batten, with one side sitting under the end of the batten and the other connecting below the mounting track onto the substrate.
The flexibility of our Click-on products means they can easily allow for lighting to be added to walls, ceilings and facades quickly and easily.
Down and can lights, inlaid lights, linear lights and cove lights are all able to be achieved.
For detailed information and PDF/DWG formatted examples on how to add integrated lighting within Sculptform products, you can access our blog: How to detail integrated lighting.
Always consult your lighting engineer regarding any custom solutions in your wall or ceiling.
When creating a hidden door for a project our batten system allows for several options depending on the requirement.
From concealed fix doors, hinged doors and bi-fold doors we have a solution for you. The best way to find more information on how to achieve this within your project is within our dedicated blog on the topic. You can find it here: How to seamlessly detail a concealed door.